Archive

Archive for the ‘tools’ Category

PowerShell TDD: Testing CmdletBinding and OutputType

July 11th, 2022 No comments

A while ago, I decided to add PowerShell to my automation toolbox. Since I believe the best way to learn a new language is to do test-driven development and PowerShell has a fantastic module for this, called Pester. The framework is super intuitive, easy to do mocking in, and allows you develop your code design from tests.

However, one thing bugged me. I didn’t seem to be able to write code that tested whether a function had declared CmdletBinding (i.e. was an Advanced Function), or if it had declared OutputType.

# How can I test this?
function MyFunction {
    [CmdletBinding(SupportsShouldProcess, ConfirmImpact='High')]
    [OutputType('String')]
    ...
}

Google didn’t have anything useful on this subject so I tried my luck on StackOverflow and mclayton pointed me in the right direction (although, as mclayton puts it: it’s a bit of a mouthful). It turns out that I can use the built-in Abstract Syntax Tree (AST) and specifically the Param block attributes to find out if CmdletBinding is declared.

Testing CmdletBinding

The below function takes a command as input and looks for a CmdletBinding param block attribute.

function Test-CmdletBinding {
[OutputType([Bool])]
[CmdletBinding()]
    param (
        # Parameter help description
        [Parameter(Mandatory)]
        [System.Management.Automation.CommandInfo]
        $Command
    )

    $attribute = $command.ScriptBlock.Ast.Body.ParamBlock.Attributes | where-object { $_.TypeName.FullName -eq 'CmdletBinding' };

    $null -ne $attribute
}

You can then use the helper function in a Pester test, like this.

It "Should be an advanced function" {
    $c = Get-Command -Name MyCommand
    Test-CmdletBinding $c | Should -BeTrue
}

Testing CmdletBinding Arguments

That’s great, but what about arguments, like SupportsShouldProcess or ConfirmImpact?

[CmdletBinding(SupportsShouldProcess, ConfirmImpact='High')]

How can I test for those? Well, that’s where we get mouthful bits I guess, but the good news is that it’s doable. Here’s a helper function that can test those scenarios. It takes a command, an argument name, and an optional argument value and returns true if the command meets those conditions.

function Test-CmdletBindingArgument {
    [CmdletBinding()]
    [OutputType([Bool])]
    param (
        # Parameter help description
        [Parameter(Mandatory)]
        [System.Management.Automation.CommandInfo]
        $Command,
        [Parameter(Mandatory)]
        [string]
        $ArgumentName,
        [Parameter()]
        [string]
        $ArgumentValue
    )

    $attribute = $command.ScriptBlock.Ast.Body.ParamBlock.Attributes | where-object { $_.TypeName.FullName -eq 'CmdletBinding' };

    if ($attribute) {
        $argument = $attribute.NamedArguments | where-object { $_.ArgumentName -eq $ArgumentName };

        if ($null -eq $argument) {
            # The attribute does not have the argument, return false
            $false
        } elseif ($argument.ExpressionOmitted) {
            $ArgumentValue -eq '' -or $ArgumentValue -eq $true
        } elseif ($argument.Argument.Extent.Text -eq '$true') {
            $ArgumentValue -eq '' -or $ArgumentValue -eq $true
        } elseif ($argument.Argument.Extent.Text -eq '$false') {
            $ArgumentValue -eq $false
        } else {
            $ArgumentValue -eq $argument.Argument.Value
        }
    } else {
        # No such attribute exists on the command, return false
        $false
    }
}

The code handles both implicit and explicit values, e.g.

[CmdletBinding(SomeAttribute)]
[CmdletBinding(SomeAttribute=$true)] # same as having the attribute declared
[CmdletBinding(SomeAttribute=$false)] # same as not having the attribute declared
[CmdletBinding(SomeAttribute='Some Value')]

Here are a couple of examples of Pester tests using the helper function.

It "Should have CmdletBinding with ConfirmImpact set to High" {
    $c = Get-Command -Name MyCommand
    Test-CmdletBindingArgument $c -ArgumentName 'ConfirmImpact' -ArgumentValue 'High' | Should -BeTrue
}

It "Should have SupportShouldProcess declared" {
    $c = Get-Command -Name MyCommand
    Test-CmdletBindingArgument $c -ArgumentName 'SupportShouldProcess' | Should -BeTrue
}

Testing OutputType

Testing OutputType requires a slightly different approach. Since the OutputType attribute declares a type we have to access it through the positional arguments (instead of named arguments that were used for CmdletBinding).

Here’s a helper function to verify that a given command has declared a given type as its output type.

function Test-OutputType {
    [OutputType([Bool])]
    [CmdletBinding()]
    param (
        # Parameter help description
        [Parameter(Mandatory)]
        [System.Management.Automation.CommandInfo]
        $Command,
        [Parameter(Mandatory)]
        [string]
        $TypeName
    )

    $attribute = $command.ScriptBlock.Ast.Body.ParamBlock.Attributes | where-object { $_.TypeName.FullName -eq 'OutputType' };

    if ($attribute) {
        $argument = $attribute.PositionalArguments | where-object {
            if ($_.StaticType.Name -eq 'String') {
                $_.Value -eq $TypeName 
            } elseif ($_.StaticType.Name -eq 'Type') {
                $_.TypeName.Name -eq $TypeName 
            } else {
                $false
            }
        }
        if ($argument) {
            $true
        } else {
            $false
        }
    } else {
        $false
    }
}

Note that a type can be declared as a string or as a type, but the helper function handles both cases:

[OutputType([Bool])]
[OutputType('System.Bool')]

And here’s an example of how it can be used within a Pester test.

It "Should have Output type Bool" {
    $c = Get-Command -Name MyCommand
    Test-TDDOutputType $c -TypeName 'Bool' | Should -BeTrue
}

Introducing TDDUtils

I have created a PowerShell module called TDDUtils, which contains the above functions (although named with a TDD prefix) as well as more general versions that allows you to test other attributes than CmdletBinding and OutputType.

 You can install it from an Administrator PowerShell with the below command.

Install-Module TDDUtils

I plan to add more useful functions to that module as I go on with my PowerShell TDD journey, and if you want to contribute or just give me some suggestions, feel free to contact me on Twitter.
Analog or Digital Task Board? That’s the Question.

April 8th, 2010 No comments

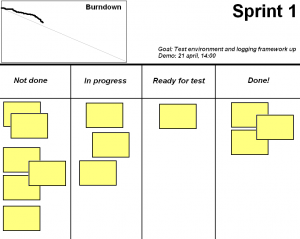
As a project manager, the best tool I’ve come across to help me monitor and control an iteration is The Sprint Task Board. It strikes a perfect balance between expressiveness and visual feedback. One quick look is all you need to make a diagnose of the ongoing iteration. Yet, it contains most of the information needed to make informed decisions.

A drawn example of a task board, containing for instance a burndown-chart, sprint goal, and tasks.

The task board is absolutely invaluable and I’ll probably never do team related work without it again. The question, though, is whether to use a computerized or a real world one.

Henrik Kniberg recommends the latter. The following quote is from Henrik’s excellent book Scrum and XP from the Trenches.

We’ve experimented with different formats for the sprint backlog,
including Jira, Excel, and a physical taskboard on the wall. In the
beginning we used Excel mostly, there are many publicly available Excel
templates for sprint backlogs, including auto generated burn-down charts
and stuff like that. […]

Instead […] what we have found to be the most
effective format for the sprint backlog [is] a wall-based taskboard!

And there are good reasons for picking an analog task board. Maybe the most significant being:

  • Visibility. A wall-based dashboard is always up, always visible. If positioned near the team it’ll work as a constant reminder of the shape of the iteration.
  • Simplicity. Planning and re-planning is simply a matter of moving physical cards around, tearing them up or writing new ones.

In my current project we’re using an application (Scrum Dashboard on top of TFS). The reasons are:

  • Availability. Actually, this is the only reason for us to use a digitalized task board. We’re having dislocated team members from time to time (did I say we’re ScrumButs?) but since our dashboard is a web application they are able to access it remotely. It would be a lot more painful to relay the information otherwise.
  • Automatic burndown update. No need for me (or any one else) to do a work remaining summary and update the burndown chart each and every day.

What are your reasons? I’d be most interested in hearing your point of view on this subject.

Cheers!

Categories: software, software development, tools Tags:

Communicating Through Waves

November 27th, 2009 No comments

Have you seen the presentation in which Google introduces their coming product Google Wave? If not, do so. I believe that the presentation holds a piece of the future. The so called Wave combines the e-mail, chat and newsgroup functionality in a way that makes the whole greater than the parts.

One of the things that caught my attention was the possibility to collaboratively produce documents or Wiki-kind of information in real-time. I had a similar idea several years ago, and seeing it implemented, as a web application –which was unthinkable at the time, makes me happy. There’s a big questionmark though whether this will work in practice. The example in the presentation shows how the information added by the remote users makes the text move around, which is probably going to be annoying in a real situation.

There’s more work to be done there I guess. But the basic functionalities of the Wave, for instance the ability to add comments and start sub threads anywhere in a message is awesome. This new way of communicating will become infrastructure in the future. That’s my quess at least.

One can’t help becoming impressed with Google. They keep pulling these innovative, cool services out of their big bag of tricks, leaving the rest of the business in a state of awe. Google Waves is yet another proof that their free thinking company policy is paying off – big time.

Cheers!

P.S. Special thanks to Paul who sent me the invitation that triggered my interest.

Categories: software, tools Tags:

Tools of The Effective Developer: Touch Typing

December 6th, 2007 1 comment

A colleague of mine thinks learning touch typing is a waste of time. He even suggests that it might be a disadvantage for a programmer to be able to type fast. While typing slowly, he reasons, one has time to reflect upon the work at hand. Well, I don’t share his point of view. I mean, should a cook not become skilled with his knives because slicing and chopping slowly gives more time to plan the next step? Of course not!

As a programmer, typing is what you do most, so you should spend time to become good at it. Touch typing is not only about rapid typing. It’s also about the freedom of your eyes. You can look at the screen and still be able to strike the right keys. That way you’ll discover typing errors more quickly.

Being able to look away and still type has another great advantage. When I get into “the zone”, my most productive state, I’d like to stay there as long as possible without interruption. If someone comes by I’m still able to continue my work thanks to touch typing. All I have to do is turn my face to the intruder and fake interest with nodding, humming and carefully placed responses like “mmm’right”, “mmm’kay” or “mmm’yes”. Try it, and I promise your productivity will skyrocket. 🙂

Learning touch typing has been well worth the investment for me. It took me approximately two months to become fluent, spending 20-60 minutes of practice every day. To my help I had Stamina, a free typing tutor software, which I gladly recommend.

You could, like me, create your own keyboard layout. I have based mine on a swedish version of Dvorak, with more convenient placement of special characters common to programming. I’m not sure I want to recommend creating your own layout though, at least not if you’re a Windows user. One thing I’ve had problems with is that certain IDEs have been shadowing parts of my layout, forcing me back to qwerty and my old-style typing. And, you’ll need your own layout installed, which is a problem if you’re using computers that belong to others.

Whether you decide to create your own layout or not, be sure to learn touch typing. You’ll be grateful you did.

Previous posts in the Tools of The Effective Developer series:

  1. Tools of The Effective Developer: Personal Logs
  2. Tools of The Effective Developer: Personal Planning
  3. Tools of The Effective Developer: Programming By Intention
  4. Tools of The Effective Developer: Customer View
  5. Tools of The Effective Developer: Fail Fast!
  6. Tools of The Effective Developer: Make It Work – First!
  7. Tools of The Effective Developer: Whetstones
  8. Tools of The Effective Developer: Rule of Three
Categories: time-optimizing, tools Tags:

Tools of The Effective Developer: Rule of Three!

December 3rd, 2007 2 comments

I’m an impatient person, of the kind that are comfortable with making quick decisions on loose grounds, but prepared to change when more information gets available. This attitude has served me well, but also put me in trouble when important decisions were made too hastily. That’s why I always use The Rule of Three nowadays.

I first came across this version of The Rule of Three in Johanna Rothman and Esther Derby’s excellent book, Behind Closed Doors. The idea is to brainstorm solutions to a given problem, and not stop until you have at least three options to choose from. Listing the pros and cons of each solution helps you make a good decision.

With The Rule of Three I’m forced to think broader. I need to widen my view to find possible solutions other than the first that springs to mind. I’ve found that this process makes me explore the original solution better, and the risk of overlooking a good option is greatly reduced. Also, two different solutions can sometimes be combined into a new, even better one.

The Rule of Three can be applied in many ways, within a group or by yourself. It’s a cheap way to build better foundations for your decisions. That’s why I embrace The Rule of Three.

Previous posts in the Tools of The Effective Developer series:

  1. Tools of The Effective Developer: Personal Logs
  2. Tools of The Effective Developer: Personal Planning
  3. Tools of The Effective Developer: Programming By Intention
  4. Tools of The Effective Developer: Customer View
  5. Tools of The Effective Developer: Fail Fast!
  6. Tools of The Effective Developer: Make It Work – First!
  7. Tools of The Effective Developer: Whetstones

Support Your Favorite Small Software Vendor Day

December 1st, 2007 2 comments

I support the initiative of Jeff Atwood who declared this day to be the “Support Your Favorite Small Software Vendor Day“.

Categories: blogging, tools Tags:

Logo Design

November 21st, 2007 2 comments

This is a paid review.

I’m not a graphic designer. In fact I stink at everything visual, so design work like layout, images, icons and logos are better handled by somebody else. Unfortunately this is not always possible, and I’m sometimes forced to produce crappy stuff on my own.

Therefore I got quite excited when asked to review The Logo Creator from Laughingbird Software. According to their website anyone could create logos that “look like a Photoshop guru spent hours laboring over!” The question was, could I do it too?

I’m happy to say the answer is yes. I find working with The Logo Creator a joy. It’s easy to create your own logotype based on one of the templates. You can change, add or remove any component of the template, or create your own from scratch. This gives you a lot of creative freedom. I for instance turned this template:

A Logo Creator Template

into this logotype:

A logotype for my website?

Which is one of the candidates for becoming the logotype of this website.

I’m not completely happy with the Logo Creator’s user interface, but since it’s so useful to me I overlook the quirkiness. That, and the price of $29.95 – there are seven available themes – makes this a highly recommendable product in my opinion. So, if you need to do some Logo Design of your own, check out The Logo Creator.

Now, if you’ll excuse me I have some logos to create.

Cheers! 🙂

Categories: review, software, tools Tags:

Tools of The Effective Developer: Whetstones

November 16th, 2007 1 comment

As a programmer you are the ultimate software development tool, and like any tool you need regular care to stay effective. If you don’t invest enough in self-improvement you’ll end up useless, with a blunt sword. I’ve seen many programmers wielding blunt swords, unable to fight their ways out of old habits and paradigms. Don’t let that happen to you. Sharpen your sword regularly.

First and foremost you should take good care of your body. Health is the most important property, and it’s achieved with exercise, nutritious food, and enough sleep; The hallmarks of software developers. 😉

The second most important sharpening activity is constant learning. If we stop learning we become frozen in the slice of time we call life. So try to learn something new every day.

For me, the best way to acquire new knowledge is by reading books. Since I spend so much time in front of the computer screen, a book is a welcome break. I can bring it and read it wherever I want, including the bed and the toilet.

Acquiring knowledge is one thing, making it stick is another. If you want to keep your knowledge for a long time, you should practice. The most effective practice is to teach others what you know. Gather your workmates and hold a lecture, or write about it on your weblog.

If your company allows it, or if you’re lucky enough to have spare-time, make a hobby project. Try to implement something based on your new knowledge. Rereading is the worst kind of practice, but something I resort to sometimes.

My most used whetstones are reading, writing and running a million hobby projects. What are yours? Which ones would you like to have? It doesn’t matter how you do it, as long as you keep your sword sharp.

Previous posts in the Tools of The Effective Developer series:

  1. Tools of The Effective Developer: Personal Logs
  2. Tools of The Effective Developer: Personal Planning
  3. Tools of The Effective Developer: Programming By Intention
  4. Tools of The Effective Developer: Customer View
  5. Tools of The Effective Developer: Fail Fast!
  6. Tools of The Effective Developer: Make It Work – First!
Categories: habits, learning, software development, tools Tags:

Tools of The Effective Developer: Make It Work – First!

October 29th, 2007 15 comments

I’ve come across many different types of developers during my nearly two decades in the business. In my experience there are two developer character type extremes: the ones that always seek and settle with the simplest solution, and the ones that seek the perfect solution, perfect in terms of efficiency, readability or code elegance.

Developers from the first group constantly create mess and agony among fellow developers. The second group contain developers that never produce anything of value since they care more for the code than they do for the result. The optimal balance is somewhere in between, but regardless of what type of developer you are: you should always start by making it work, meaning implement the simplest solution first.

Why spend time on an implementation that isn’t likely to be the final one, you might ask. Here’s why:

  1. The simple solution helps evolving the unit-testing safety net.
  2. The simple solution provide rapid feedback, and may prevent extensive coding of the wrong feature. It is like a prototype on the code level.
  3. The simple solution is often good enough, and – with a working solution ready – you are less inclined to proceed and implement a more complex solution unless you really have to. Thus avoiding premature optimization and premature design, that makes you add features that might be needed in the future.
  4. With the simple solution in place, most integration and programming interfacing is done. That makes it easier to implement a more complex solution.
  5. While implementing the simple solution, your knowledge of the system increases. This helps you make good decisions later on.

This may all sound simple enough to you. After all, the habit of Making It Work First comes naturally to many developers. Unfortunately, for me, I’m not one of those developers. I still let more or less insignificant design issues consume an unnecessary amount of time. The thing is, it is hard to find the perfect design on the first try. The perfect design may not even exist, or cost too much to be worth the effort.

That is why I struggle to attain the habit of Making It Work First.

Previous posts in the Tools of The Effective Developer series:

  1. Tools of The Effective Developer: Personal Logs
  2. Tools of The Effective Developer: Personal Planning
  3. Tools of The Effective Developer: Programming By Intention
  4. Tools of The Effective Developer: Customer View
  5. Tools of The Effective Developer: Fail Fast!

Tools of The Effective Developer: Fail Fast!

October 2nd, 2007 5 comments

It’s a well known fact that we regularly introduce errors with the code we write. Chances are slim to get it right on the first try. If we do, the risk is great that changing requirements and murdering deadlines will mess things up later on.

It’s also well known that the cost of failure increases with time. The sooner you discover the flaw, the easier it is to fix. In other words, if we are going to fail, there are good reasons to do it fast.

When developers talk about failing fast they usually refer to the defensive coding technique that is based on assertions and exception handling. It’s true that assertions are the very foundation of failing fast, they should be your first line of defense against bugs. But it doesn’t stop there. Failing fast should pervade your whole process of making software. You should fail fast on all levels.

The most effective fail fast-technique is automated testing, the fastest way to get feedback. Be sure to write the tests first. And don’t just automate unit-testing; integration and acceptance testing are often easier to automate than you might think. The key is to isolate your code using mock objects.

The fail-fast property doesn’t apply to code and systems alone. It should be used on the project level too. By using agile practices like short iterations, small releases, and on-site customers you create an environment of continuous feedback. It will help you steer the project to success, or – by failing fast – avoid a disaster. Kate Gregory puts it this way in a nice post from 2005:

“Failure can be a good thing. If it saves you from following a doomed path for a year, you’re glad to have failed early rather than late.”

Failing takes courage, failing increases your knowledge, failing calls upon action. That’s why I like the habit of Failing Fast.

This was the fifth post in this series. Here are the other Tools of The Effective Developer posts:

  1. Tools of The Effective Developer: Personal Logs
  2. Tools of The Effective Developer: Personal Planning
  3. Tools of The Effective Developer: Programming By Intention
  4. Tools of The Effective Developer: Customer View